Modern Crochet Designs for All!

It’s so great to be here on Desamour Designs! I’m Tahryn from Burgundy & Blush, visiting Elisabeth and getting to know you guys while being able to share with you the Ferne cushion cover design! Crochet is my craft of choice, and I love nothing more than cozying up on the couch with Friends on the TV and a hook in my hand. Throw some chocolate in there and I’m in heaven. I’m in the UK but I write my patterns in US terms as it’s how I learned and seems to be the most common crochet language.
I like to keep my designs fuss-free and simple, both in look and in the patterning process. While I love the look of other people’s rainbows and color changing projects, that’s just not ‘me’, so you will find my work tends to be solid in color but using textured stitches to keep things interesting. My favorite things to make are winter accessories and home decor projects, like this one.

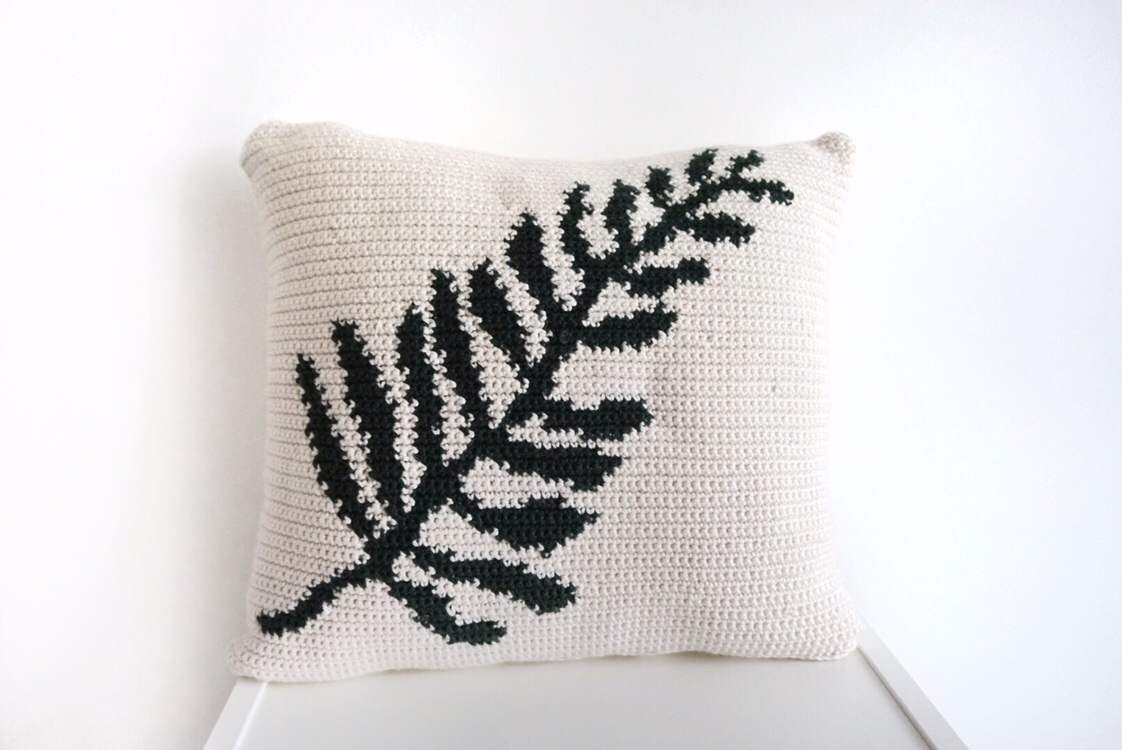
I came up with this cushion cover while I was planning my patterns for the year. I was thinking about Spring projects, and to me, Spring is all about greenery, nature, and freshening up the home! Shall we get into it?

8I’ll provide the yarn and size details for the cushion cover that I made, but the great thing about this is that you can scale up or down with any weight yarn you like as long as you work out the gauge to make it fit whatever cushion you have ready. You can also expand by adding extra rows or stitches of ‘space’ around the edges without skewing the leaf pattern.
I used an Aran/worsted weight yarn in cream (Women’s Institute Soft & Smooth) and a stash mystery green
A 4.5mm hook
The only stitch used is single crochet (US).
This grid is numbered with rows and stitches, where the numbers down the side correspond with a row and the numbers across the top tell you how many stitches across. So, for e.g., on Row 7 we will be working cream for 44 stitches, changing to green on the 45th stitch, then back to cream on the 49th stitch.
I recommend you print this image so that you can mark off the stitches and rows as you go.

2″ x 2″ – 12 rows and 10 stitches
This will give you a finished front of approx 14″ x 16 “
Now, there A LOT of colour changes in this work. But, it’s okay – there are loads of different ways to approach colour changes, and you pick one based on what you’re comfortable with. I went with a bobbin method because I wanted to practice this skill – but it can get a little messy and it’s not necessarily the simplest way – I’m just all about that self-development and leveling up!
Here are a couple of options:
– Carry the yarn behind your work (stitching in front of it), and picking back up to switch when you change colours. With this method, you will see the yarn being carried across on the reverse of your work and you’ll have lots of stripes on the back, but because this is one-sided that’s not a problem
– Carry the yarn through your work, stitching over the yarn you’re not using. This will be neat and there won’t be any ends to weave in, but with contrasting colours you may be able to see the carrying yarn through your stitches
– Bobbins, this is sectioning off your yarn into small balls that you will use for each colour change. If you have 4 colour changes on one row (e.g. in this pattern we might have cream, green, cream, green) then we’d have 2 balls of each colour joined to the work that we could pick up and change when we need to. This takes a bit more concentration to stop the strands getting tangled and confused, but is a good option for when you don’t have a hidden side that you can get messy
– Single colour changes – just joining a new colour every time you need one. This is simple to keep track of but please please think of all the ends to sew in!
Once you have completed the front you can either crochet a second panel to use for the reverse or use a square of material to stitch to. If using the material I recommend sewing together inside out, sewing a zip, and turning back around.
And there we have it! I hope you enjoy this pattern if you have any questions you can ask away over on Instagram @burgundyandblush. Don’t forget to stop by my website for more patterns.
Thanks guys!
Tahryn